Tuesday, January 31, 2012

Thirty one hour pancakes

My daughter stayed up for 31 hours straight this weekend.  Thirty-one.  From 6:00 Friday morning until 1:00 Saturday afternoon.  That's a long time people.

She had a church event Friday night in which they stayed up all night and went bowling, to see a movie and goofy golfing.  Tons of fun!  They ended the night with a pancake breakfast at a local restraunt which is super fun unless you can't eat the dang pancakes.  She made it home about 8:00 Saturday mornig completely wiped out but.......

Several weeks ago I talked to her about taking some acting lessons at a local theater.  She had a friend that was doing it and one of her normal activites was not going on this spring so we thought it might be fun.  The first class was...you guessed it... Saturday morning.

As we say in the south, "Bless her heart!"

When she stunbled in Saturday morning I knew I had to keep her awake for 2 hours before it was time to leave.  If she fell alseep it was all over.

So I made these:

Mini Puffed Pancakes


These are alot like the Brazillian cheese rolls I've shared before.  You put the ingrediants into the blender and blend away.

3/4 cup flour (I used Pamela's)
3/4 cup of milk
2 eggs
1/8 tsp salt
2-3 Tbsp of melted butter (you know I went with 3)
Just a tip: Put the milk in first and then the flour.  I don't like the flour to get all gummy at the bottom.  And I need a new blender-not a walmart cheapy-any suggestions would be great!

Anyway- just pour the batter into a mini muffin tin that has been sitting in your oven while it preheats to 400 degrees.  I actually made these twice this weekend and the second time I spooned the batter into the cups and it did better and I got more. Bake for about 20 minutes. It made about 30 little muffins.


They poof up nice and cute and are very bite sized.  I spooned some melted butter over them (yes I did) and poured some of the good syrup on them and sprinkled them with powedered sugar.  


 I sat them in front of Jenny and went to cleaning the kitchen.  I suddenly realized that my poor, half asleep child was softly singing:

"These are so yummy, so very yummy.  These are yummy.  I really like them."

Bless her heart.

She made it to acting class and back home.  She ate a little lunch and hit the sack.  She slept for about 5 hours but had to get up for her brother's play that night.  She slept great Saturday and Sunday night but based on the melt down over science homework last night - she's still playing catch up.  Either that or compound mixtures are a lot more serious than previously thought.

Either way, make these. They are cute and yummy and will keep a 10 year old awake for long enough to compose an original song.

Recipe adapted from our bestbites.com.  And I seriously want  would like to have that heart shaped pan!

Thursday, January 26, 2012

Dear Middle School Teacher (again)


At the beginning of this week I got an email that it was time to sign up for the teacher appreciation lunch that would be held today.  I have been haunted by the disaster  I took last time and I wanted to show you what I could really do.  So when the email came I took a good look at my calendar and this is what I saw.

I knew this would be a busy few days so I decided two things:

1.  That this would be the perfect time to rearrange my kitchen/ keeping room.

2.  That I would sign up to make a chocolate cake.

Why?  Because I have lost my cotten pickin' mind thats why!

And because I wanted to make this cake for you.  Isn't it pretty!  I knew I could do that.  And I could do it Gluten Free which I felt like would deserve bonus points.  Bonus point which I need in pre-algebra and science.  Not that I would be trying to blackmail you with cake but you understand.  

Anyway-  In my mind this was a beautiful cake.  And then I went a little crazy and started thinking about how I could put it in a cake box and everyone would say "How pretty, Where is this from?"  And I could put a lable on the box with my blog address on it and then everyone would marvel that I had made the cake and how great it was and then someone would read my blog and then they would call me and I would say, "I would love to write a cookbook!"  And that would be great because I was thinking through all of this while I was moving my keeping room all around and I could use the money cause now I need a new rug.

But I was also thinking about the great blog post I could write when I showed off the beautiful cake.  About how you all have made my 8th grader's middle school years so great.  About how much he is going to miss you next year.  About the difference you've made.  I was even going to name names!!

I thought about it yesterday morning and yesterday afternoon-I need to make that cake today.  Last night between church and big projects (you know who you are) and dress rehearsals I made this.


Definately yummy, but its not chocolate cake.

This morning about 6:45 I remembered the chocolate cake.  I would have whipped it out.  I could have whipped it out, but I had to take my daughter to the doctor.  

So dear sweet teachers here is what I brought.


I completed my assignment.  I turned it in on time but I can't help but think that perhaps this isn't what they had in mine when I signed up.

I took the next picture to show that at least it was a chocolate pudding cake.


And I had to ask myself why they are so proud of the artificial flavoring?

Anyway, Kroger cakes are yummy so there's that.  I rarely get to just buy something off the shelf ready to eat so that was kinda fun.  My kitchen is clean and my keeping rooms new arrangement is great!  So all in all I think I have turned another "C" worthy project.  

Next time though I'm getting an "A" if it kills me!

Wednesday, January 18, 2012

How to Sleep Well at Night

What keeps you up at night?  Worrying about your kids? About drugs and rock music and all that comes along with that-if you catch my drift.  Wondering what to do about all the problems in the world? Poverty, hunger, wars.  What keeps me up at night?  How do I make gluten free bread sticks?  How?  How to make them soft and chewy.  What if can't do it.  Jenny asked for them weeks ago! I have to figure this out!  I have to!!!  AAAAHHH!

Ok so that was a little over the top.  But I do lay awake and think about how to make certain things they ask for.  And Jenny wanted bread sticks.  She knows just how to phrase it too.

"Mommy?"

"Yes, dear?"  (You always answer your children that way, right?!)

"You remember when we used to always go to that pizza place?  You remember they had bread sticks?  You remember how good they were?  I miss those so much."

"I know baby"

"I bet you could do it Mommy."

"Sure I can do that."  I can make soft chewy bread sticks without the stuff that makes them soft and chewy.  Sure.  No sleep till I figure it out.

But I love a challenge and this one turned out great!

Bread sticks two ways :


Parmesan Bread sticks


I started out with a package of Bob's Red Mill GF Pizza mix.


I don't typically use a lot of mixes just because they are so expensive, but I hit a sale at Big Lots of all places and I bought about 6 bags of this for $2.90.  Can't beat that.

I just mixed it according to the directions and let it sit for about 20 minutes.

I grated some Parmesan cheese into a pie plate.


I then dump 1/2 of the dough onto a mat and sprinkled it with flour just to make it easier to handle.  I put the other half in the fridge.


I took a golf ball size ball of dough.


I then rolled it into a "stick" about 6 inches long.  I brushed each stick lightly with an egg/water mix just to help it brown pretty and for the cheese to stick.  (1 egg and about 2 Tbsp. of water)

I then rolled them in the cheese.


I lined them all up on a baking sheet lined with parchment paper and baked them at 375 for 20 minutes.


I had to snap this quick before someone ate the last two!  I have to say that this turned out great!  They were not really cheesy but you could taste the Parmesan.  The were a little crunchy on the outside and so soft on the inside.  We served them with pizza sauce and they were gone in minutes!  Perfect for a party or spend the night company.


Cinnamon Bread sticks:
I did the same thing with the other half of the dough as I did to the first.  I placed it on a mat.  Sprinkled with flour and rolled it into sticks.

But instead of egg and cheese I brushed them with butter and then rolled them in cinnamon and sugar.


I have no idea what the cinnamon to sugar ratio was here.  Just do what feels right to you.  I mean at least where sugar and cinnamon are concerned.


Into the oven for 15 minutes at 375.  

To make these really yummy you could make a sort of frosting/glaze to dip them in.  That would be a lot of sugar and way over the top. 

I totally did that.


About 2 cups of powdered sugar. About 2 Tbsp of milk.  The leftover melted butter and some vanilla.

Do not eat this with a spoon.  That would be immature and a little gross.

Don't judge me.

Instead put it a cute red cup and serve it up with cinnamon bread sticks.


These were good too!  My one note on these is that they were definitely not as soft as the ones the night before.  Next time I think I would let the dough get to room temperature before rolling them.  That being said my 13 year old just sat and groaned as he ate them.  That's a good thing.  At least today it was.

So rest well tonight friend.  No need to worry about how to make soft bread sticks.  We got that one covered.  

Saturday, January 14, 2012

Speakers, measuring spoons and homemade bread

Awhile back my daughter spotted an item in one of those scholastics order form the kids bring home from school.  Now I'm a sucker for books.  That's one thing I tend to spend a good bit of money on.  I would have bought her a book from the order form, but that is not what she wanted.  She wanted a $12.00 set of cardboard speakers to plug her ipod into.  Yes, I said cardboard speakers.  As you can imagine the answer was no.  To which she replied that she would be glad to use her own money.  Now I'm a believer in allowing your children to make mistakes with their money.  In allowing them to learn life's lessons the hard way, but I seriously just could not give in to this.  $12.00 cardboard speakers?!  As she cried (believe it or not) I asked her if she remembered the beautiful stainless steal measuring cups we had seen at the cooking store earlier in the day?  She did.  I explained how much I wanted them.  How much I felt like I needed them.  How I wanted to feel like a real baker.  How those would complete me as a cook.  But alas, they were $30.00 and I had measuring cups and it just didn't make sense to spend money on something like that.
Well, she still doesn't have cardboard speakers, but look what I got for Christmas!


I'm so happy I decided to make bread!!

I tried a new recipe for bread this time.

1 Tbsp yeast
1 Tbsp of sugar
1 1/2 cups of arm water ( about 105 degrees)

Combine the yeast and sugar in a bowl and add the hot water. ( I used a candy thermometer to make sure it was the right temp.  It really makes a big difference to make sure that's right.)
Set aside and it starts to look like this.
Bubbly yeast is very promising!

Combine in the bowl of your mixer:
2 1/2 cups GF flour (I used Pamela's of course)
2 tsp xantham gum
1 tsp. salt (I used kosher)

In another bowl (What's with three bowl recipes lately!!)

Whisk together
3 eggs
1 1/2 Tbsp. oil
1 tsp. cider vinegar
1/4 cup sour cream (That's a guess-it wasn't in the recipe but I added it in-a big "dollop")

Add both liquid mixtures to the dry mix and blend with mixer for about 4 minutes.

Line a loaf pan with parchment paper.


You can also just spray your pan, but when I use my new stainless steel measuring cups and parchment paper I feel like a real grown up!

Pour the batter into the pan and put in a warm pace to rise for about an hour.  This is when I new the bread had promise.

Here it is when I put in the nice warm spot.  Clearly the laundry room due the huge pile of to be ironed clothes behind it!


Here it is an hour later.


Yeah for bread that rises!  Makes me so happy!  My own little science experiment in the laundry room.  In my experience GF bread doesn't always cooperate when it come to rising so I was ecstatic about this!

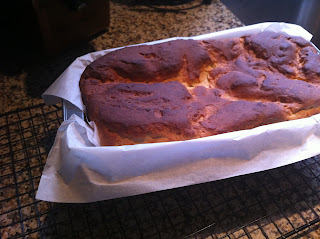
Bake at 375 for 60 minutes.  It will start to brown too much on top.  Just cover with tin foil and let it keep baking cause I didn't do that and I panicked and took it our about 10 minutes early and it did this.


Kind of sunk in the middle.  Sad face!!  It was super yummy though!  Just a little too soft in the middle.  It was really good though.  Nice and soft.  Not grainy at all.

My kids are weird and although there was homemade bread ready when they got home from school they wanted fruit snacks so I decided to cut it into slices for french toast the next morning.  Because it was a little too soft I cut it and let it sit overnight.

I mixed about 1/2 cup of milk and 2 eggs and 1 tsp. vanilla in a pie plate. I soaked each piece and put it on the griddle.


Put it on plate and serve it up!


Excuse the paper plate.  It was Tuesday morning.  You know how that is.  Will ate it up.  Jenny didn't complain which says a lot.  

It was really good.  It was the new measuring cups I'm sure of it!

P.S.  Jenny never did get those cardboard speakers.  She did however get some real speakers for ipod so all is well in her world.  For now.

Thursday, January 12, 2012

I spy something CA-RA-ZY!

Oh Walmart.  Sometimes you make my head hurt.
Which one of these is not like the other?


Tuesday, January 10, 2012

I'm Baaack with red velvet

Ok.  So back in November when I said I was going to give the blog a little more love over the holidays what I meant was January.  You know, the January holidays.  Ok.  Never mind I'll just be real and tell you November and December kicked my tail this year!  My first major craft show for my little business, my daughter had an accident in November that involved a heavy door, a pinky finger, a lot of blood and a lot of time at doctor offices, Thanksgiving, Christmas, New Years, and my husbands 40th birthday.  Followed by the ensuing aftermath of putting real life back in order.  Whew-I'm beat!  I love, love, love the holidays but I will admit to being glad to be able to catch my breath and catch up and blog already!!

As I mentioned my darling husband turned 40 this week.  That's just nuts because I was pretty sure our parents were all 40.  I'm sure of it because I went to their 40th birthday party!  What?!?!  That was 20 years ago. No freakin' way! Where does it go-this time thing!?!

Jenny decorated her daddy's car the night before.  


We had a party with all our family and some long time friends.  We had good food and a good time.  Shane is not a big sweets eater which is why he still looks like he did 20 years ago.  I made him a lemonade pie which is his favorite, but I need cake on a birthday dang it!

So we made red velvet!

I've never made red velvet and didn't have a tried and true recipe to use so I kind of made one up.  I took 3 different recipes and melded them together and here is the result.


This is actually the trial run.  The real ones were much cuter and more 40th birthday-ish.  Black sprinkles and all.  But I forgot to take a picture.  Boo.  The recipe is long and not all that fast to make, but red velvet is sort of a special occasion kind of thing and a little extra time is ok.  I will make this note though- this made a lot of cupcakes-like 30.  One of my pet peeves is that most recipes make 24 cupcakes.  I don't know about y'all but my daughters class always has 25 or 26 kids in it.  This recipe made 30 cupcakes!  Fabulous!

One other note.  A lot of times I use a flour blend like Pamela's, but for this I used several different flours.  I did this because these flours are used in a white cake recipe that I like.  I felt like the cake would be lighter in texture.

One last note.  I'm pulling it all back together and I will be signifigantly more consistant here.  My kiddos have put in some interesting request the last few days and so I've got to get busy.  One of my resolutions is to write more because when I grow up I want to be writer and well, I'm growing up fast so I better get busy!  2012 is going to be awesome!  Now go make red velvet cupcakes!

Red Velvet Cupcakes

Mix together :
1 cup white rice flour
1 cup potato starch
1/2 cup tapioca flour
1/4 cup buttermilk powder
1 tsp. salt
1 tsp. soda
1 tsp. baking powder
3/4 tsp xantham gum

In the bowl of your mixer mix together:
1 cup (2 sticks) butter- softened
1 cup white sugar
1 cup brown sugar
3 eggs

In a 3rd bowl (yea I know-lots of dishes)
2 tsp vanilla
2 1/2 Tbsp. red food coloring
1/2 cup cocoa 

1/2 cup sour cream
1 cup milk
2 tsp. vinegar

To the butter/egg/sugar mixture add the sour cream and mix well.  Add in cocoa/food coloring mix. Mix well. Add 1/2 the flour.  Mix. Add 1/2 the milk.  Mix. Repeat.  Add the vingar.  Bake at 350 for about 18 minutes.

Cream cheese frosting.  
2 sticks softened butter
1 block of softened cream cheese
vanilla to taste
milk 
about 3 cups of powdered sugar

Mix butter and cream cheese until smooth.  Add vanilla.  Add in powdered sugar a cup at time.  Add milk until you get the disred consistency.

Enjoy!